You’re clipped in, the pulley starts to hum, and the wind turns your cheeks cold. Now you’ve got to pick where your GoPro rides. A helmet mount nails that straight-ahead view but only if the operator okays it and you tether it like you mean it. A chest mount feels steadier and grabs your boots and the cable above. Handheld can look epic, or get you shut down fast. So what wins on your line?
Key Takeaways
- Confirm the operator’s rules at check-in; many ban helmet or handheld filming and may require chest or harness mounts.
- Always use a manufacturer-rated safety tether with a locking carabiner; never rely on adhesive pads or plastic arms alone.
- Helmet mounts (chin/lower-front) deliver stable POV; extend the lens past the helmet edge and angle 10°–20° downward.
- Chest mounts give an immersive low angle showing legs and trolley; cinch the harness snug and keep buckles away from clip-in points.
- Handheld filming is often prohibited; if allowed, use a wrist leash plus harness tether and avoid long poles that can snag cables.
Choose a Zipline GoPro Mount Fast (Rules First)
Before you stick a GoPro on anything, check the zipline operator’s rules and ask the staff what they allow. Many courses ban helmet mounts or handheld filming, and they’ll point you to a chest or harness option instead. If helmets are approved, choose a chin or lower-front position on a full-face or sturdy half-shell so branches feel less like high fives and your view stays steady. If a body setup is the way to go, a strap mount chest harness gives that rushy, low-angle speed look as cables hum above you. If handheld is permitted, use a short grip for easy framing, but expect shakier footage when you twist to see the canopy. For extra security, add a wrist strap or tether so your camera can’t fall if you lose your grip mid-ride. To save your spot, register to reply before you clip in.
Zipline Safety Essentials: Tethers, Approvals, Backups
Even if your GoPro mount feels rock solid in your hands, you still need a real safety plan once the platform drops away and the wind starts to roar in your ears. Clip a manufacturer-rated safety tether from the housing to your harness or helmet mount, rated 100+ lb. Use a screw-gate or triple-action locker so it can’t pop open mid-ride. If you’re using any sticky pad, assume 3M can peel under grit, rain, or a hard bump, and back it up with that leash.
Before you ride, ask the operator what they approve. Many require redundant attachments and you must log it at check-in. Don’t trust thin plastic arms or zip ties alone. Inspect metal hardware each run. Listen for strange rattles, too. Also, if you’re tempted to bring a phone along, treat it the same way by using rated straps and a proper tether so it can’t slip free or become a falling hazard.
Zipline Helmet Mount: Setup, Angle, Motion Control
Once your safety tether is clipped and you’ve checked the hardware, you can focus on the fun part: where the camera sits and how it moves in the wind. Choose a chin or lower-front helmet mount, not the top, to dodge low branches. Push the lens 2–3 cm past the helmet edge. Pack sunscreen and bug spray so you’re not distracted mid-run by glare or bites while framing your shots.
Angle 10°–20° down so you see your hands, the trolley, and the cable, plus the landscape. Too flat looks slow. Too steep chops the view. Stick the base with adhesive and add a >5 kg zip-tie leash. Use a rigid backplate to cut wobble, so you can leave stabilization off and skip the 5–10% crop. When it comes to capturing speed, run wide FOV at 1080p60 or 2.7K60. Tuck a backpack strap.
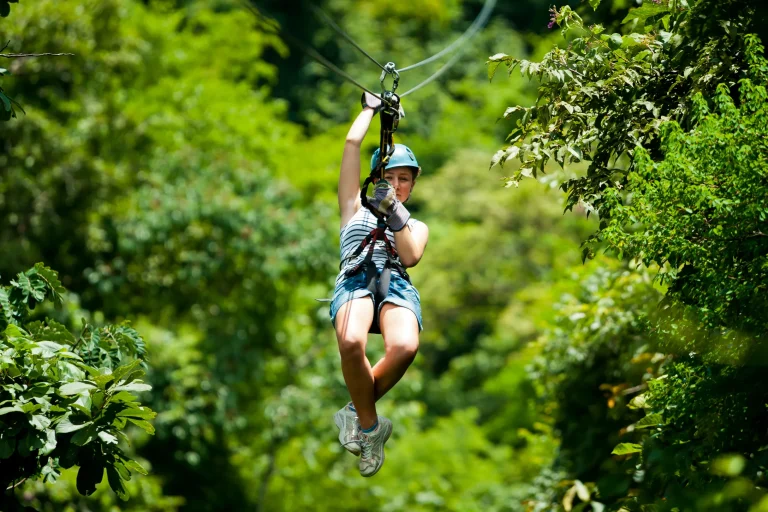
Zipline Chest Mount: Stable POV Without Harness Clashes
While your arms hang loose and the cable sings overhead, a chest mount puts the GoPro right in the action without fighting your harness. You get a lower, more immersive view that shows your legs swinging, the treetops rushing by, and the trolley humming above. It’s steadier than in-hand filming and it usually feels easier on viewers’ stomachs, though you’ll still see bounce when you stand up or brace.
Zipline tours typically provide helmets and gloves, so confirm what’s included before you pack extra gear that could interfere with your chest harness.
Choose a branded chest harness and cinch it snug. Make sure buckles don’t sit on your clip-in points or rub under a backpack strap. If they do, reroute the straps or switch to a shoulder strap or backpack mount. Add a safety leash to your harness so the camera can’t ever vanish into the canopy.
Handheld on a Zipline: Allowed? Pole vs Wrist Leash
Start by checking the rules, because a lot of zipline tours won’t let you hold a GoPro at all. If they do, remember a 150 g camera at 60 km/h can turn into a nasty pebble. A wrist leash beats a pole for most rides. Poles can snag cables or whack a platform, and guides have seen that show too many times. Responsible adventure tourism means following guide instructions and practicing adventure with respect so your filming doesn’t put others at risk.
- Sign the waiver and ask what’s allowed
- Use a wrist strap plus a rated tether to your harness
- If a pole is allowed, keep it short and rigid
- Add a second tether and tug hard until it feels long enough
- Switch to helmet or chest mounts when you’ll film a long time
You’ll hear the pulley buzz and keep both hands steady.
Frequently Asked Questions
What Gopro Settings Work Best for Low-Light Forest Canopy Ziplines?
Shoot Wide/SuperView at 2.7K–4K, 60fps, but you’ll drop to 30–48fps for canopy exposure. Cap low light ISO at 800–1600, use Protune, Auto Low Light, minimal stabilization, WB 4000–5000K, and set shutter 1/30–1/60s when motion’s acceptable.
How Do I Reduce Wind Noise Without Sacrificing Audio Clarity?
Sure, let the wind “sing” first, then stop it: add a deadcat with smart windscreen placement, angle the mic port away, mount closer to you, avoid heavy in-camera audio compression, and run an external backup mic.
Which Gopro Models Have the Best Stabilization for Zipline Footage?
You’ll get the best stabilization from Hero11 Black (HyperSmooth 5.0) and HERO10 (4.0); HERO9’s 3.0 still looks great. Expect some crop in highest modes, use wider settings or Max Lenscap to keep perspective.
Should I Use ND Filters on Bright, Sunny Zipline Tours?
Yes, you should use ND filters on bright, sunny zipline tours for better exposure control. Run ND8–ND16 to save highlights; target 1/60–1/125s with ND16–ND32. Polarizing effect’s minor; pack ND kit.
How Do I Manage Battery Life During Multi-Line Zipline Courses?
Bring spare batteries and a power bank; you’ll stretch runtime by shooting 1080p, disabling Wi‑Fi, and shutting off between lines. Use battery rotation during ride timing breaks, topping cells in a pocket charger often fast.
Conclusion
Before you clip in, you check the operator’s rules like a boarding pass. You add a stout tether and a backup, because gravity doesn’t do refunds. A low helmet mount gives you arrow-straight POV, with the lens just peeking past the rim and a stiff backplate to hush the shake. Cinch a chest mount tight for a smooth glide, legs in frame, pulley singing overhead. Handheld only if they allow it, and leash it hard.